I love creating custom party decor. I have many products including: name banners, cupcake toppers,
centerpieces, invitations,thank you cards, favor tags, and more. I also make handmade greeting cards.
Please check out my etsy store to see my current items for sale. www.5mcreations.etsy.com
Email me for more info on a custom set to match your event. Thank you for visiting.
I love receiving comments and messages from visitors so please let me know you stopped by.
Melissa
Saturday, December 31, 2011
5M Creations at a party near you!- Toy Store Party
Here are the adorable photos of Jordache's Toy Store Party. This party was done by Something Chic Party & Events featuring lots of 5M Creations products.
Friday, December 30, 2011
Jordache's Toy Store Birthday Party
I was asked to create a custom party for Jordache's 1st birthday in a Toy Store theme. Lots of bright primary colors, polka dots, and a fun font.
Toy Store Invitation
Party Sign
Jordache's Toy Store Birthday Banner
Primary Polka Dot Water Bottle Label
Food Tent Cards
Jordache's Toy Store Centerpiece
Primary Color Toy Store Cupcake Toppers
Thank you for shopping with me! Favor Bags
Check back tomorrow to see the adorable party photos.
Wednesday, December 21, 2011
DIY Ornament Garland
This is a super easy way to make a big visual impact in your decor. This ornament garland is perfect for any table, mantle, or like mine on top of my entry way shelf. It is such a great pop of color.
Start with a collection of shatterproof ornaments in any color.
Use any grosgrain ribbon that will coordinate with your ornaments. I used white and it just disappeared beneath all the ornaments as I hoped.
Cut ribbon at an angle to make a point. Feed the ribbon through loop at top of ornament. Some brands of ornaments may require you to hot glue the ornament top to ornament. Without this they may fall off garland. Test a few to see if you need to do this. Mine did not.
Alternate colors as you go to create dimension. You can rotate and turn them to get the placement you want during or after stringing. You can use a variety of sizes for a fuller garland. The smaller ones will fill in any gaps although they are not necessary. I used all one size.
Continue to string ornaments until you reach your desired length constantly moving them down as needed. Knot ribbon at both ends and trim. Your ornament garland is complete. Display it in your home for all to see.
I used approximately 75+ ornaments to create a 4ft long garland.
Enjoy! As always feel free to post your crafty creations on my facebook wall. www.facebook.com/5mcreations.
Tuesday, December 20, 2011
Red & Lime Green Christmas Birthday Party Set
Here is a closer look at the products featured at the Pancake Christmas Pajama Party. You can see the party photos here.
Red & Lime Green Ornament Christmas Birthday Party Invitation
Red & Lime Green Ornament Christmas Birthday Party Sign
Red & Lime Green Ornament Christmas Birthday Party Centerpiece
Red & Lime Green Ornament Christmas Birthday Party Cupcake Toppers
Red & Lime Green Ornament Christmas Happy Birthday Banner
Red & Lime Green Polka Dot Juice Box Wraps / Labels
Red & Lime Green Polka Dot Napkin Wraps
Matching Water Bottle Labels are also available. Can be personalized with child's name.
Red & Lime GreenChristmas Birthday Party Ribbon Tied Favor Boxes
Each box had a personalized initial ornament, candy, and the girls each got a Christmas hair bow.
Thanks for looking! You can see more party lines in my etsy store. www.5mcreations.etsy.com
Monday, December 19, 2011
DIY Glitter Trees Tutorial
Here is a quick tutorial on how to make the DIY Glitter trees featured in the Christmas Birthday Party. I forgot to take photos of the process when I made the originally. I had planned to make another to show but my local craft store is out of the cones now. :( You will have to use your imagination as you read along.
Start with paper mache cones in any variety of sizes. You could also use foam cones but I liked the smoothness of these to work with.
Hold on to the tip and drizzle plain white Elmer's Glue all over cone. I used a sponge brush to spread the glue over the cone evenly until covered. You can go back after the base is dried and touch up the tip.
Sprinkle glitter of any color over entire cone while rotating and tap off excess.
Set carefully on wax paper and allow to dry. Once it is dry go back and touch up the tip and any other spots light on glitter. I just used my sponge again with a light amount of glue on it. I dabbed any needed spots and sprinkled the glitter again.
Once final touch ups are dried go outside and spray entire cone with a sealer like this. It will seal the glitter so it does not flake off everywhere and give it a glossy shine.
Allow to dry and you will have gorgeous glitter cone trees. Super easy and sparkly.
Mine are now a part of my Christmas mantle
and end table. I added a few vases of ornaments and this quick and easy subway art Christmas wording to complete the look.
Give them a try and have fun crafting!
As always feel free to post your crafty creations on my facebook wall. www.facebook.com/5mcreations.
As always feel free to post your crafty creations on my facebook wall. www.facebook.com/5mcreations.
Friday, December 16, 2011
Pancake Christmas Pajama Birthday Party
Finally here is a look at the red and lime green ornament Christmas birthday party. My best friend and I threw this for our 5 year old daughters. It features many 5M Creations products along with several DIY crafts I cannot wait to share with you. I will be posting different elements of the party over the next week. Here is a look at the actual party. We invited all the kids to come in their Christmas pajamas for a pancake breakfast.
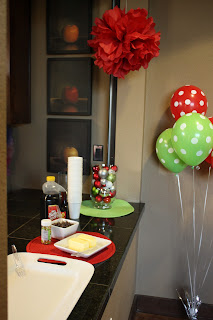
Guests were welcomed with this cute snowman and 5M Creations polka dot balloons in red and lime green.
And of course a 5M Creations Happy Birthday party sign on the interior door to set the theme for the party.
Our cupcake table featured a fun centerpiece, tissue poms, and cupcake toppers.
You can view the tutorial for these here. To get the red and green layered look I just stacked the tissue paper in alternating color before folding.
Christmas Birthday Cupcake Toppers- Lime Green and Red Ornaments, Happy Birthday, and 5.
These beauties decorated a table in the room. Red, lime green, and silver glitter trees and vases filled with ornaments. Be watching for a DIY tutorial for the trees.
Our big 5 year olds in front of the Christmas Happy Birthday Banner and polka dot balloons. This is also where we opened gifts. A perfect photo backdrop.
The kids table.
It featured more glitter trees and an ornament garland...
polka dot plates(Target), giant candy canes(Costco), juice box wraps(NEW at 5M Creations), and napkin wraps all in a red and lime green dot pattern.
The pancake bar!
Perfectly topped with red and lime green dot sprinkles. I could not pass these cuties up.
12 hungry kids.
After pancakes they decorated sugar cookies,
And ate them of course.
We played an impromptu game of pin the Santa on the Christmas tree. We happened to have 2 sided wrapping paper with us with Santa on the back.
Opened gifts,
And ate cupcakes. Yes we loaded them full of sugar.
Everyone in their jammies.
As they left each child received a favor box. Watch for a post later this week for a peek inside of them and another crafty idea.
It was such a fun party. I cannot believe our girls are 5. I am so thankful for all the friends who made this party so much fun. Happy Birthday girls.
Watch for more posts featuring the invites, a closer look at the 5M Creations products, and several DIY crafts.
Subscribe to:
Comments (Atom)


