This week I officially opened my Etsy store. So far I have several sets of my first note cards and a set of wedding cards. Most of my other favorites that I have made have been given away. I am hoping to start making more cards and party decor just to list. If you are friends or family and live locally and I can meet you to deliver cards and refund shipping.
Please check it out!
Scroll through my older posts to see my other cards.

Wednesday, March 31, 2010
Monday, March 29, 2010

Friday, March 26, 2010
Thinking of you!
I have a fun pack of paper that has lots of different butterfly patterns. I loved the bright colors of pink, purple, and greens in this one. I made a die cut with my cricut in a dark pink polka dot patterned paper. Then covered it with glitter. I love how girly this card is. Madison got to use this as a birthday card for a friend this week. She loved it!


Note cards set 3
Here is my final set of note cards. These have all been from the first set I made when I decided to try paper crafting. These are very similar to the first set I showed with images cut from the same 12x12 sheet and paired with coordinating papers. I love the glittery accents on these cards.

On this card I added a strip of matching paper to the inside of the card as well to carry the colors throughout.


On this card I added a strip of matching paper to the inside of the card as well to carry the colors throughout.


Wednesday, March 24, 2010
Thank you cards
Here is another set of cards using patterned strips. I love the springy flowers in this set. I paired it with a coordinating strip of ribbing again. This time I added a frame with a stamped border and Thank you message using white ink on colored paper. I love the soft look of these cards.


Monday, March 22, 2010
Note cards set 2
Here is the next set of note cards I created. This one was even less steps to make. Again I took a strip of paper from a 12x12 sheet that had stripes of different patterns. I loved these bright flowers. Then I added a strip of scalloped border and coordinating ribbon. A message can be stamped in the blank space for the appropriate occasion or just left the way the are.


Thursday, March 18, 2010
Note cards
My first set of cards that I made was a blank set of note cards. I took a piece of scrapbook paper that was a whole bunch of boxes with cute images in them and cut it all up. I had another piece that was stripes of lots of patterns. I cut it into separate strips as well. I just pieced them together with either a coordinating print paper or one of the patterned strips and a solid card stock base. Very easy and cute. They have worked well as thank you cards and notes from Madison. They also gave me a chance to practice with different types of adhesives.
Here is part of my first set.


Here is part of my first set.


Monday, March 15, 2010
Wedding Cards set 2
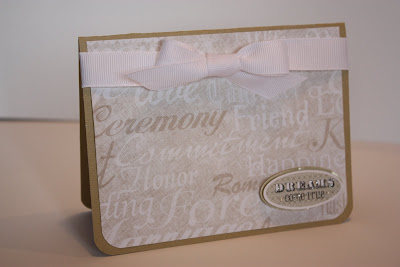
As promised here is the second wedding card set. This is my favorite. I love how crisp the silver and white look. And particularly how sparkly this set is. I may have to go get more of this paper to create a few more.


Friday, March 12, 2010
Wedding Cards
I was asked by a friend to make a wedding card for her to use. I set off to the craft store to find some suitable paper. I came home with 3 options and some embellishments. I have used 2 so far creating 2 sets of wedding cards. I love the cake embellishments on these cards. They add so much sparkle.
Here is the first set.


Here is the first set.


Come back Monday to see set number 2.
Thursday, March 11, 2010
The big 1-0!
ETA: Sorry to anyone who read this earlier today. Apparently my pics were to big to be fully seen.
My little sister turned the big 1-0 this last weekend. She asked me to make her a cake. Her party theme was a dog set from Birthday Express.

She asked for a paw print with blue and green polka dots. This is what I made.


I also happened to have pawprint paper so I made her a card as well. Since being 2 digits is such a big deal I decided to add a 10.


Happy Birthday Haley! I love you ~Sissy
Tuesday, March 9, 2010
Gift bags
I am in the process of making several things right now. Until I have pictures to share I will show you some crafts from Madison and Sydney's birthdays. I made a gift bag for Sydney's gift to coordinate with some tissue paper I had found.
And I made favor bags for Madison and Haley for some extra treats I bought. The girls loved having their names on them. Madison carried hers around for weeks. It doesn't take much to make a white bag look cute.


And I made favor bags for Madison and Haley for some extra treats I bought. The girls loved having their names on them. Madison carried hers around for weeks. It doesn't take much to make a white bag look cute.


Friday, March 5, 2010
Black & Red
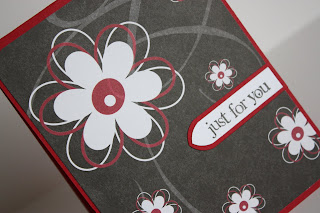
I came across this paper looking for something to make a wedding card with. I stopped my search and sat down to make a completely different card all together. This is what I cam up with. I started with a gray background but realized I needed more color. I decided to play off the red in the flowers. I love the contrast it brings. Amazing how cheery red can make black seem.


Wednesday, March 3, 2010
My Little Pony Birthday Party
I have shared some of these photos on my personal blog but I thought they would be fun to share here as well.
I created digital invitations that I printed, cupcake picks, water bottle labels, and favor boxes for Madison's 3rd birthday. Birthday parties are a major weakness for me. I LOVE planning them and adding the special little details that make the theme go even further. I am full swing into planning the boys party and can't wait for my best friend to find out what she is having so I can get started on her baby shower. There will be lots of pics to share over the next few months.


I created digital invitations that I printed, cupcake picks, water bottle labels, and favor boxes for Madison's 3rd birthday. Birthday parties are a major weakness for me. I LOVE planning them and adding the special little details that make the theme go even further. I am full swing into planning the boys party and can't wait for my best friend to find out what she is having so I can get started on her baby shower. There will be lots of pics to share over the next few months.


Subscribe to:
Posts (Atom)